Claude Meets Salesforce: A Practical Guide to Building AI Agents That Actually Do Work

Salesforce holds your customers, deals and tasks. Claude is good at reasoning, writing and following instructions. Put them together and you get assistants that can read your CRM, explain it in plain language and take action inside it. This post walks through the three ways Claude and Salesforce connect today, then shows how to connect them step by step and what to keep in mind when you build an agent. 

Three ways Claude and Salesforce connect 


1. Claude as the reasoning model inside Agentforce 

Agentforce agents run on a language model. Salesforce’s default is a managed mix of models, and its documentation lists Anthropic models among the options, operated on Amazon Bedrock inside the Salesforce Trust Boundary. Requests still pass through the Models API and the Einstein Trust Layer, so masking, audit and zero-data-retention controls continue to apply. Availability depends on your org and edition, so confirm with Salesforce before you plan around it.

2. Claude reading and updating Salesforce data through connectors 

Claude can connect to Salesforce through a connector built on the Model Context Protocol (MCP). Once connected, you can ask Claude to look up your user details, query records or create and update them, all from a chat. The connector acts with your Salesforce permissions, so a user only reaches what their profile allows. Salesforce also offers hosted MCP servers, which give agents controlled access to CRM data and actions. 

3. Claude as your development partner 

Claude can write the pieces of a Salesforce project: Flow metadata, Agent Script, Apex and Lightning Web Components. The key detail is where the commands run. Deploys happen with the Salesforce CLI (sf), which must be authenticated to your org. A chat assistant in a sandbox cannot log in for you, so you run the sf commands on your own machine and share the output. A coding tool running on your machine, such as Claude Code, can run them directly. 

Step by step: connect Claude to your Salesforce org 


Setup has two halves: allow Claude into Salesforce, then add the connector in Claude. 
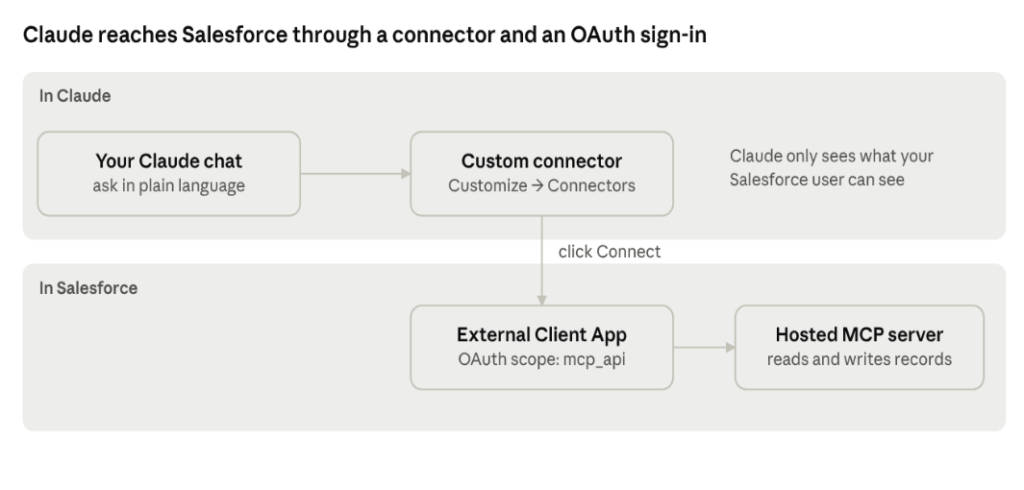
connection flow · 4 steps, 2 lanes 

The connector is the front door in Claude. The External Client App is the OAuth key that lets it into your org, and the sign-in uses your own Salesforce user. 

Part 1: In Salesforce 


  1. Open Setup and search for MCP Servers. Turn on a Salesforce hosted MCP server (they became generally available at TDX 2026) and copy its server URL. 
  1. Create an External Client App. Older guides call this a Connected App. Enable OAuth Settings. 
  1. Set the callback URL to https://claude.ai/api/mcp/auth_callback. 
  1. Add the OAuth scopes mcp_api and refresh_token. Some guides also add offline_access. 
  1. Set the OAuth policy so users can authorize themselves, save, then copy the Consumer Key (the Client ID). 

Part 2: In Claude 


  1. Sign in at claude.ai, open Customize in the left sidebar, then Connectors. Older versions put this under Settings. 
  1. Click Add, then Add custom connector. 
  1. Name it “Salesforce MCP” and paste the server URL from Part 1. 
  1. Open Advanced settings and paste the Consumer Key as the OAuth Client ID. 
  1. Click Add, then Connect. A Salesforce login opens: sign in and click Allow. 
  1. Start a chat and ask: “Which Salesforce user am I, and what is my profile?” Claude may ask permission to use the connector the first time. 

What you should see 

After the sign-in, the connector shows as Connected and its Salesforce tools are available in your conversations. Answers come from your org under your own permissions. 

If it fails 

  • One reported case: the Salesforce sign-in succeeded, yet Claude said “Authorization with the MCP server failed”. The fix there was to paste the Consumer Key into Advanced settings and use the mcp_api scope. 
  • Check the callback URL character by character. 
  • Menu names, scopes and endpoints change between releases. Compare with Salesforce’s current hosted MCP documentation. 

How an Agentforce agent is built: brain and hands 


It helps to split an agent into two parts. 

  • The brain is the language model. It reads the user’s message, decides what is being asked and writes the reply. 
  • The hands are actions, usually Flows or Apex. They are the only way the agent changes anything in Salesforce. 

An agent with a good brain but no hands can only talk.

Practical tips for your own build 

  • Start small: one object, a few actions, one clear job. 
  • Keep Flows narrow. One action per Flow is easier to test and to trust. 
  • Pass only the inputs the Flow needs, and return a short, readable result message. 
  • Filter by owner or permissions inside the Flow, not only in the agent’s instructions. 
  • Keep humans in the loop for destructive actions such as delete. 
  • Read the Live Test trace, not just the chat reply. It shows which tools ran. 
  • Set a real agent user before you publish. A placeholder user is fine for drafts, not for production. 

Getting started 

  1. Install the Salesforce CLI and log in to a sandbox or developer org. 
  1. Create a project with sf project generate. 
  1. Generate an authoring bundle and read the boilerplate to learn your CLI version’s syntax. 
  1. Build your first Flow and wire it to one action. 
  1. Validate, deploy the Flow, then deploy the bundle. 
  1. Test in Agent Builder, review the trace and tighten the instructions. 
  1. Publish only when the behavior is predictable. 


Conclusion 

Claude and Salesforce work well together when each does what it is best at. Salesforce keeps the data, permissions and trust controls. Claude supplies reasoning, language and development help. The agent only becomes useful when its actions are connected and its limits are written down. Build small, validate often and read the trace.